External Apps
Apps in Makaira are fairly simple. You can create a website which is then loaded inside of an iFrame in the Makaira Backend. By sending a message with the postMessage method you can request the JWT-Token of the currently logged-in user to send Makaira API requests from your application afterwards.
Create your app
As mentioned above, Makaira apps are nothing more than websites. Therefore, you can use any technology you like, to write your application. To get you started, we provide a boilerplate that is written in PHP and Symfony 6.1.2. You can find the public repository here.
If you're more comfortable with JavaScript, we've also developed a boilerplate based on Next.js. You can find this repository here.
Your app has to have at least one main entry route. You'll need this entry point URL when registering the application at Makaira. In the Makaira backend, this URL will be loaded inside the iFrame.
Remember routing only with preset url parametersKeep in mind that you need to hand over the GET parameters from Makaira at every internal request.
e.g. If you want to redirect to a twig view/test-routeyou need to attach theapp.request.query.allparameters to your requested, path to ensure correct Auth on the next page:{{ path('test_route_view', app.request.query.all) }}
Register your app at Makaira
At the moment, you can register your Application only via an HTTP-Call to the Makaira API. This will register your app for the given instance and will show your application afterward on the dashboard.
The slug is the identifier of your app and has to be unique on the given instance. It can only contain lower-case letters, numbers and - as a separator, in other words: it has to match this Regex ^[a-z0-9\-]*$
The externalURL field has to contain the in the previous step mentioned URL to the entry point route. The URL has to include the protocol which has to be HTTPS. Otherwise, the app can not be requested in the Backend. The URL can also contain any path and query parameters.
The type can be either app or content-widget whereas the content-widget renders in the page editor as a new tile and the app uses the whole canvas.
Receiving the secrets is only possible at creationThe API-Response will contain the field
clientSecret. This 20 character long random string is generated by the API and can only be obtained by the response of the creation request. Keep this secret save, otherwise it will be lost.
curl --location --request POST 'https://{subdomain}.makaira.io/app' \
--header 'X-Makaira-Instance: {instance}' \
--header 'Authorization: Bearer <BEARER-TOKEN>' \
--header 'Content-Type: application/json' \
--data-raw '{
    "slug": "example-app",
    "icon": {
        "type": "font-awesome",
        "content": "alicorn"
    },
    "externalURL": "https://example.com/app",
    "type": "app"
    "title": {
        "de": "german title",
        "en": "english title"
    }
}'
const myHeaders = new Headers();
myHeaders.append("X-Makaira-Instance", "instance");
myHeaders.append("Content-Type", "application/json");
myHeaders.append("Authorization", "Bearer <BEARER-TOKEN>");
const raw = JSON.stringify({"slug":"example-app","icon":{"type":"font-awesome","content":"alicorn"},"externalURL":"https://example.com.de/app","title":{"de":"german title","en":"english title"}});
const requestOptions = {
method: 'POST',
headers: myHeaders,
body: raw,
redirect: 'follow'
};
fetch("https://{subdomain}.makaira.io/app", requestOptions)
.then(response => response.text())
.then(result => console.log(result))
.catch(error => console.log('error', error));This request (like all others) needs authorization. You can use for this your Bearer Token that you can get from every request sent in the Makaira Admin UI. Otherwise you can also use the shared secret with a signed request.
The externalURL will later be extended on our end with the query parameters domain, instance, nonce and hmac
Validating requests to the app
Your app is now registered and is displayed on the Dashboard in the Makaira Backend. To ensure that your application is only requested through the Makaira Backend we will load the app with the additional query parameters domain, instance, nonce and hmac. The HMAC is calculated with the schema nonce:domain:instance and the clientSecret that you received during the app creation as a secret. The used hashing algorithm is sha256.
To validate that the request was sent from Makaira, you should calculate inside your app the expected HMAC and compare it to the HMAC of the query parameters. If both hashes match, you can render your application. Otherwise, you should display an error page.
$nonce    = $request->query->get("nonce");
$domain   = $request->query->get("domain");
$instance = $request->query->get("instance");
$hmac     = $request->query->get("hmac");

$expected = hash_hmac(
  'sha256',
  sprintf('%s:%s:%s', $nonce, $domain, $instance),
  $this->clientSecret
);

return $hmac === $expected
Requesting the current JWT-Token
To receive the JWT-Token of the currently logged-in user you have to communicate with the postMessage method to the window.parent object, which is the Makaira Backend. If you send the correct values, which the Backend validates, it will answer with the JWT-Token as the payload.
Before sending the postMessage you have to generate a new HMAC which will be validated by the Backend. The body of the HMAC consists of nonce:domain:instance:makairaHmac. You received the variables domain, instance and makairaHmac in the query parameters, we loaded your application inside the iFrame with. makairaHmac equals here the received parameter hmac. nonce should be a by your application generated random string. The hash algorithm is again sha256 and use the received clientSecret as secret.
Don't generate the HMAC with javascript in the frontend. This would lead to exposing the
clientSecret. Instead generate it in the backend and only expose the generated hmac + nonce.
After you generated the new hmac, send it together with the random generated nonce, the makairaHmac (which is the hmac from the query parameters), the action requestUser and the source makaira-app-slug (where slug is the slug that you used for creating the app) through the postMessage method to the Makaira Backend.
The method call in JavaScript would then look like:
function requestUserFromMakairaBackend(hmac, nonce, makairaHmac) {
    const message = {
        "source": "makaira-app-boilerplate", // replace with makaira-app-{YOU_APP_SLUG}
        "action": "requestUser",
        "hmac": hmac,
        "nonce": nonce,
        "makairaHmac": makairaHmac
    }

    window.parent.postMessage(message, document.referrer)
}
To receive the answer from the Makaira Backend with the token, you have to register an event listener for the message event. If the token is valid the message will contain the action responseUserRequest . If it is invalid the message will contain the action responseUserRequestError .
Listening to the event in JavaScript would look similar to this:
window.addEventListener("message", (event) => {
		const { source, action, data, message } = event.data

    // Check that the message came from the makaira backend
    if (source !== "makaira-app-bridge") return
    // Check that the response came from a makaira domain. https://*.makaira.io
    if (event.origin.match("https:\\/\\/([a-zA-Z])+\\.makaira\\.io")?.index !== 0) return

    if (action === "responseUserRequest") {
        const { token } = data

        // from here on you can send authorized API requests
    }

    if (action === "responseUserRequestError") {
        // handle the error
    }
})
To get an overview over the complete token flow you can find here a flow diagram of the process:

flow diagram of the request token process
Use Makaira ActionLayer

When you want to use our ActionLayer to handle some events like: Save & back to list, Abort & back to list, Save & continue of Makaira Admin. You could send a message like Requesting JWT-Token.
function openActionLayerFromMakaira() {
    const message = {
        "source": "makaira-app-boilerplate", // replace with makaira-app-{YOU_APP_SLUG}
        "action": "openActionLayer",
        "metadata": {
          "saveButton": <boolean | string>
          "backButton": <boolean | string>
          "saveBackButton": <boolean | string>
        },
    }

    window.parent.postMessage(message, document.referrer)
}
Variable description
metadata: If metadata = null/undefined, the full 3 default buttons will be shown with the default button's title.saveButton,backButton,saveBackButton:- If value = false / undefined, button will not be show
- If value = true, the button will be shown with the button default's title
- If value = any string, the button will be shown with the button title is the input value
When the user interacts with the ActionLayer by clicking on its buttons. The message will be sent to an app. You can listen on the message and define what action followed.
window.addEventListener("message", (event) => {
		const { source, action, data, message } = event.data

    // Check that the message came from the makaira backend
    if (source !== "makaira-app-bridge") return
    // Check that the response came from a makaira domain. https://*.makaira.io
    if (event.origin.match("https:\\/\\/([a-zA-Z])+\\.makaira\\.io")?.index !== 0) return

    if (action === "responseActionLayer") {
        const { message } = data
        switch (message) {
            case: 'save' // ~ saveButton action
            	...
            	break;
            case: 'back' // ~ backButton action
              ...
              break;
            case: 'save_back' // ~ saveBackButton action
              ...
              break;
        }
    }
})
When some actions inside the app occur and you need to close the ActionLayer. You can send the message to Makaira admin and the layer will be hide
function closeActionLayerFromMakaira() {
    const message = {
        "source": "makaira-app-boilerplate", // replace with makaira-app-{YOU_APP_SLUG}
        "action": "closeActionLayer",
    }

    window.parent.postMessage(message, document.referrer)
}
Tryout your local app without deploying to a server
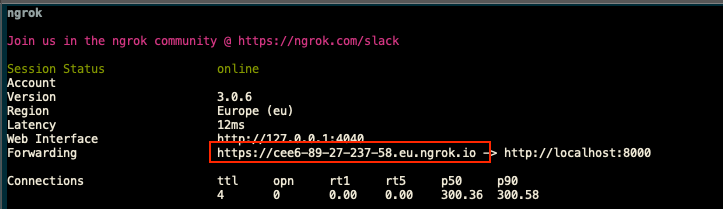
To check if your application works as expected in the Makaiara Backend without deploying it, you can use a tunneling service like ngrok or Cloudflare Tunnels to expose your local deveploment server. To Makaira, it looks then like if it was deployed to a server.
At first, you have to start a local deveploment server. If you use our provided boilerplate, you can simply start a development server with the Symfony CLI. Run the following command to start the server on port 8000.
symfony server:start --port=8000If you have correctly installed ngrok and added connected the agent with your ngrok account you can now expose the port 8000 to the public.
ngrok http 8000Ngrok will return you an URL under which your app can now be reached. You can now use this URL to create an app via an API-Call to Makaira.
Remember to set the correct valuesKeep in mind that you have to replace the
CLIENT_SECRETvariable in the .env.local file with the secret from the API response. Also you have to replace thesourcevariable in the Auth flow withmakaira-app-{YOU_APP_SLUG}
Delete a your app
You can delete a registered app by sending a DELETE request to the /app/{slug} endpoint.
After that, your App will no longer be reachable through Makaira Backend.
curl --location --request DELETE 'https://{subdomain}.makaira.io/app/example-app' \
--header 'X-Makaira-Instance: {instance}' \
--header 'Authorization: Bearer <BEARER-TOKEN>' \
--header 'Content-Type: application/json' \
--data-raw '{}'
var myHeaders = new Headers();
myHeaders.append("X-Makaira-Instance", "{instance}");
myHeaders.append("Content-Type", "application/json");
myHeaders.append("Authorization", "Bearer <BEARER-TOKEN>");
var raw = JSON.stringify({});
var requestOptions = {
method: 'DELETE',
headers: myHeaders,
body: raw,
redirect: 'follow'
};
fetch("https://{subdomain}.makaira.io/app/example-app", requestOptions)
.then(response => response.text())
.then(result => console.log(result))
.catch(error => console.log('error', error));Updated 9 months ago
Learn how to embed apps into the page editor and manipulate the data of a page from within your app.