

A/B Experiments for Landing Pages
With Landing Page A/B Experiments you can test different versions of a landing page against each other without having to maintain two separate pages. Components on the page (teasers, banners, product lists, promotions, etc.) are tagged with a variant marker (A, B, C) directly inside the Page Editor. Makaira then plays out the variants according to the traffic distribution you defined and measures performance against your real visitors.
Typical questions you can answer with this:
- Does a different hero teaser drive more revenue?
- Which arrangement of product lists has a lower bounce rate?
- Does an additional promotion banner increase conversions or hurt visit length?
Landing Page A/B testing is part of the Makaira A/B Experiments module and requires the Page Editor. See Requirements below.
Requirements
- The A/B Experiments module is booked
- The Page Editor module is booked
- Use of a current version of Makaira Connect (from version 2.6.4) or Makaira Connect Legacy (from version 2021.2.3), or the current Makaira Storefront
- Makaira tracking is active (see Tracking → Integrations / A/B Testing tag for Google Tag Manager)
- The Landing page / generic page view tag is active in your tag manager and fires on every non-product / non-category / non-search page (see Tracking → Tags)
Without the landing page page-view tag, Matomo records no pageviews for landing pages — the A/B Experiments → Results view will then show empty metrics (no visits, no bounce rate, no orders attribution) even if visitors are actually reaching the page. This is the single most common reason a landing page experiment "looks broken". Verify the tag is firing using your tag manager's preview mode before starting the test.
How it differs from other A/B test types
Unlike Ranking Mix, Personalization, Recommendation or Frontend tests, a landing page experiment is bound to one specific landing page. The "B scenario" is not a separate configuration interface — instead, you stay inside the regular Page Editor and use the variant marker on each component to define which version it belongs to.
Other key differences:
- Up to 5 landing page experiments can run in parallel (other test types: only one per instance).
- Each landing page can have only one active experiment at a time. Landing pages already in a running experiment are filtered out when creating a new test.
- The winner is applied by clicking "set live" in the result view, which permanently writes the chosen variant back to the page.
Setting up a Landing Page A/B test
1. Assign variants to components in the Page Editor
Prepare the landing page before creating the A/B experiment. Open the page in the Page Editor and mark each component with the variant it belongs to — the experiment will pick up these assignments when you create it in the next step.
For each component on the page you can decide whether it belongs to:
- Variant A (original) — the unchanged version
- Variant B
- Variant C (optional)
To assign a variant to a component:
- Open the component's context menu (the three-dot menu next to the component).
- Hover over AB Testing and choose Variant A, Variant B, or Variant C.
- A component without a variant marker is shown to all visitors regardless of the assigned group.
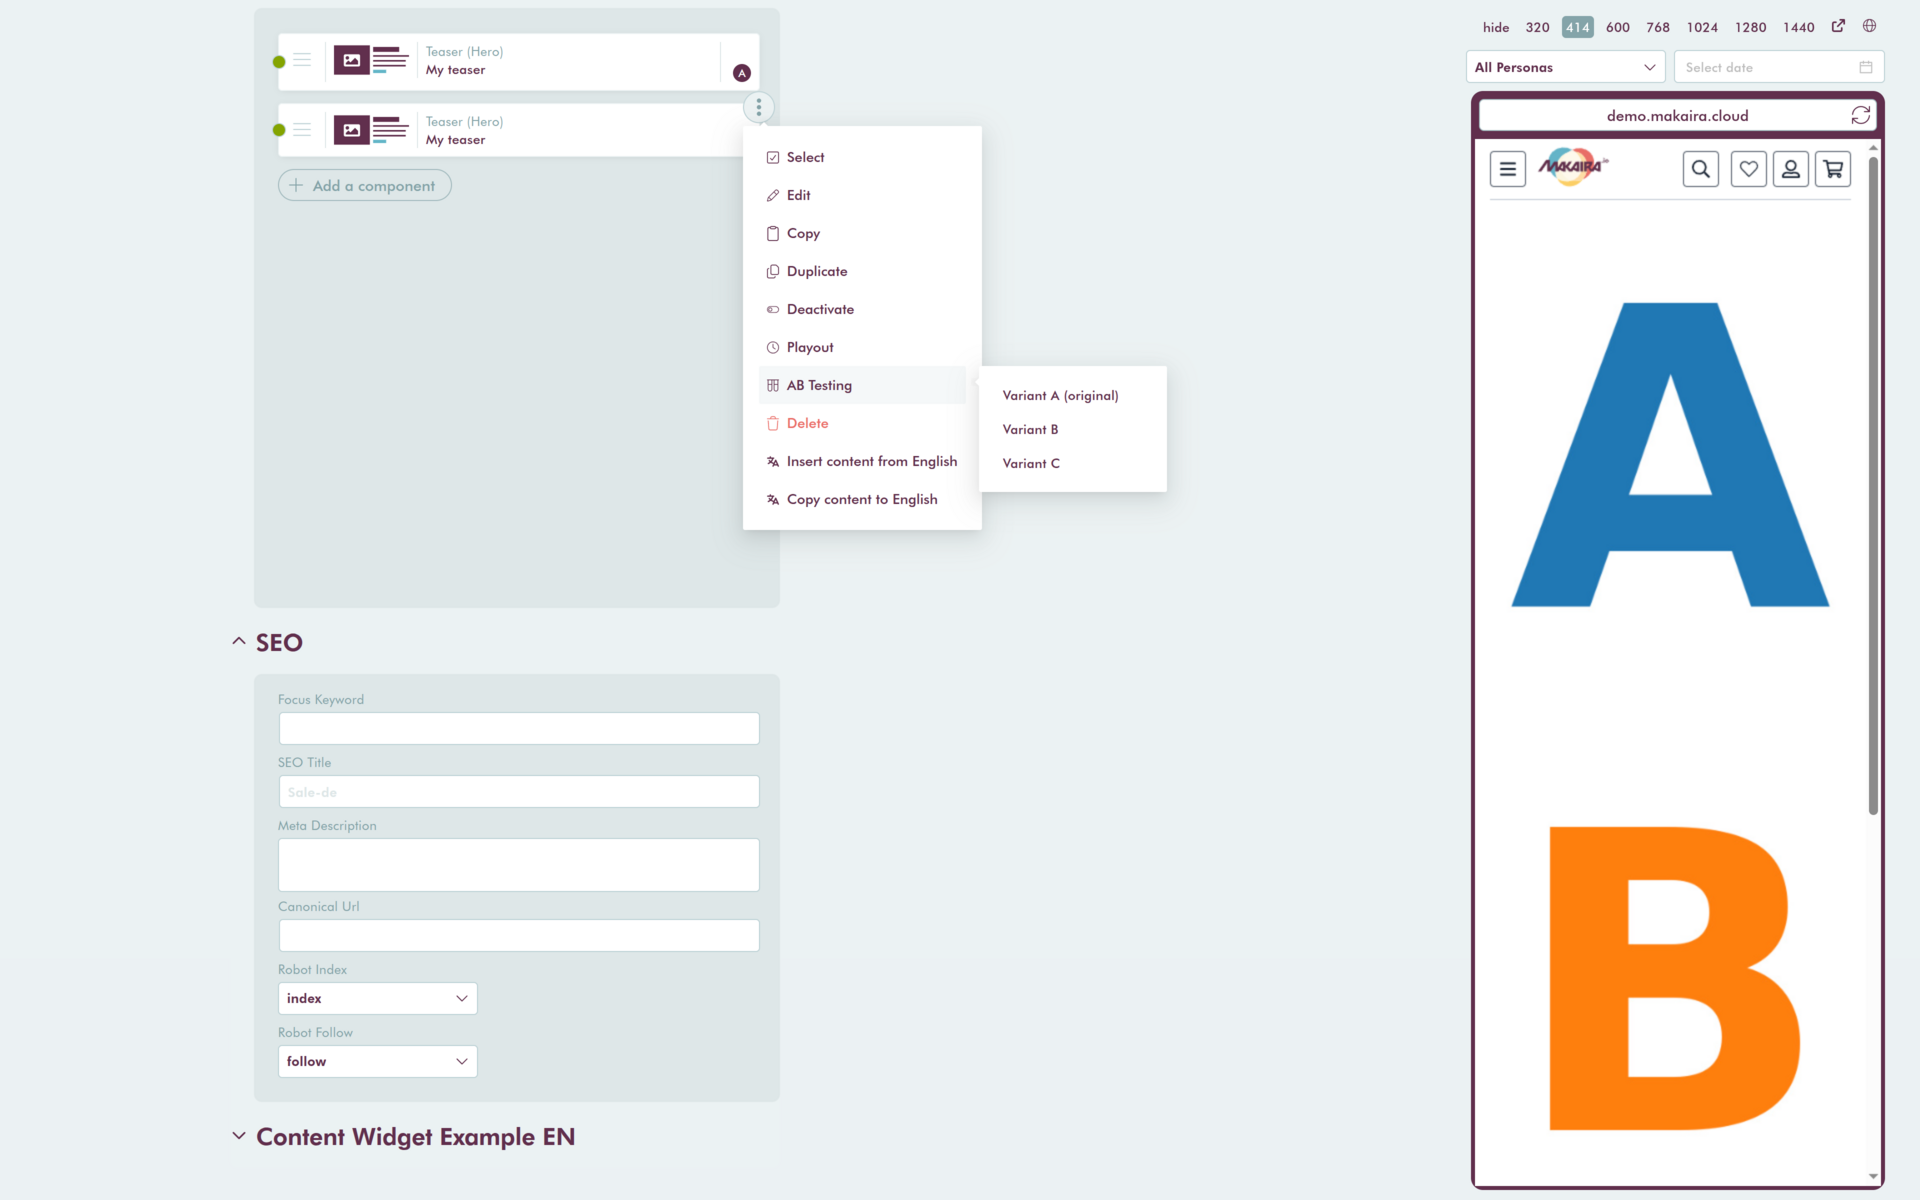
You can preview each variant directly in the Page Editor using the variant selector in the live preview header (All components / No variant / Variant A / Variant B / Variant C). The selection is reflected in the preview URL via the ab-variant parameter, so the storefront live preview shows exactly what a visitor in that group would see.
Tagging variants is safe while editing — nothing changes for live visitors until you start the experiment. As long as no experiment is running, every visitor sees the page exactly as if no variants existed: components tagged Variant A are shown (they are the original), components tagged Variant B or Variant C are hidden from live traffic and only appear in the preview when you pick that variant in the selector. Once the experiment is started, the traffic split kicks in and B/C content starts being served to the configured share of visitors.
Make sure you have at least one component assigned to Variant B (and, if applicable, Variant C) before starting the test. Without variant-tagged content, an experiment will not produce meaningful results.
2. Create the experiment
Once the variants are assigned, create the A/B experiment that will play them out:
- Open A/B Experiments in Makaira and click Create a test.
- Under Type of test, choose Landingpage.
- In Select landingpage, pick the landing page you prepared in step 1.
Only landing pages that are not currently part of a running experiment appear in this list. - Give the test a meaningful name (e.g. Hero teaser — variant test Q2).
- Click Proceed to test configuration.
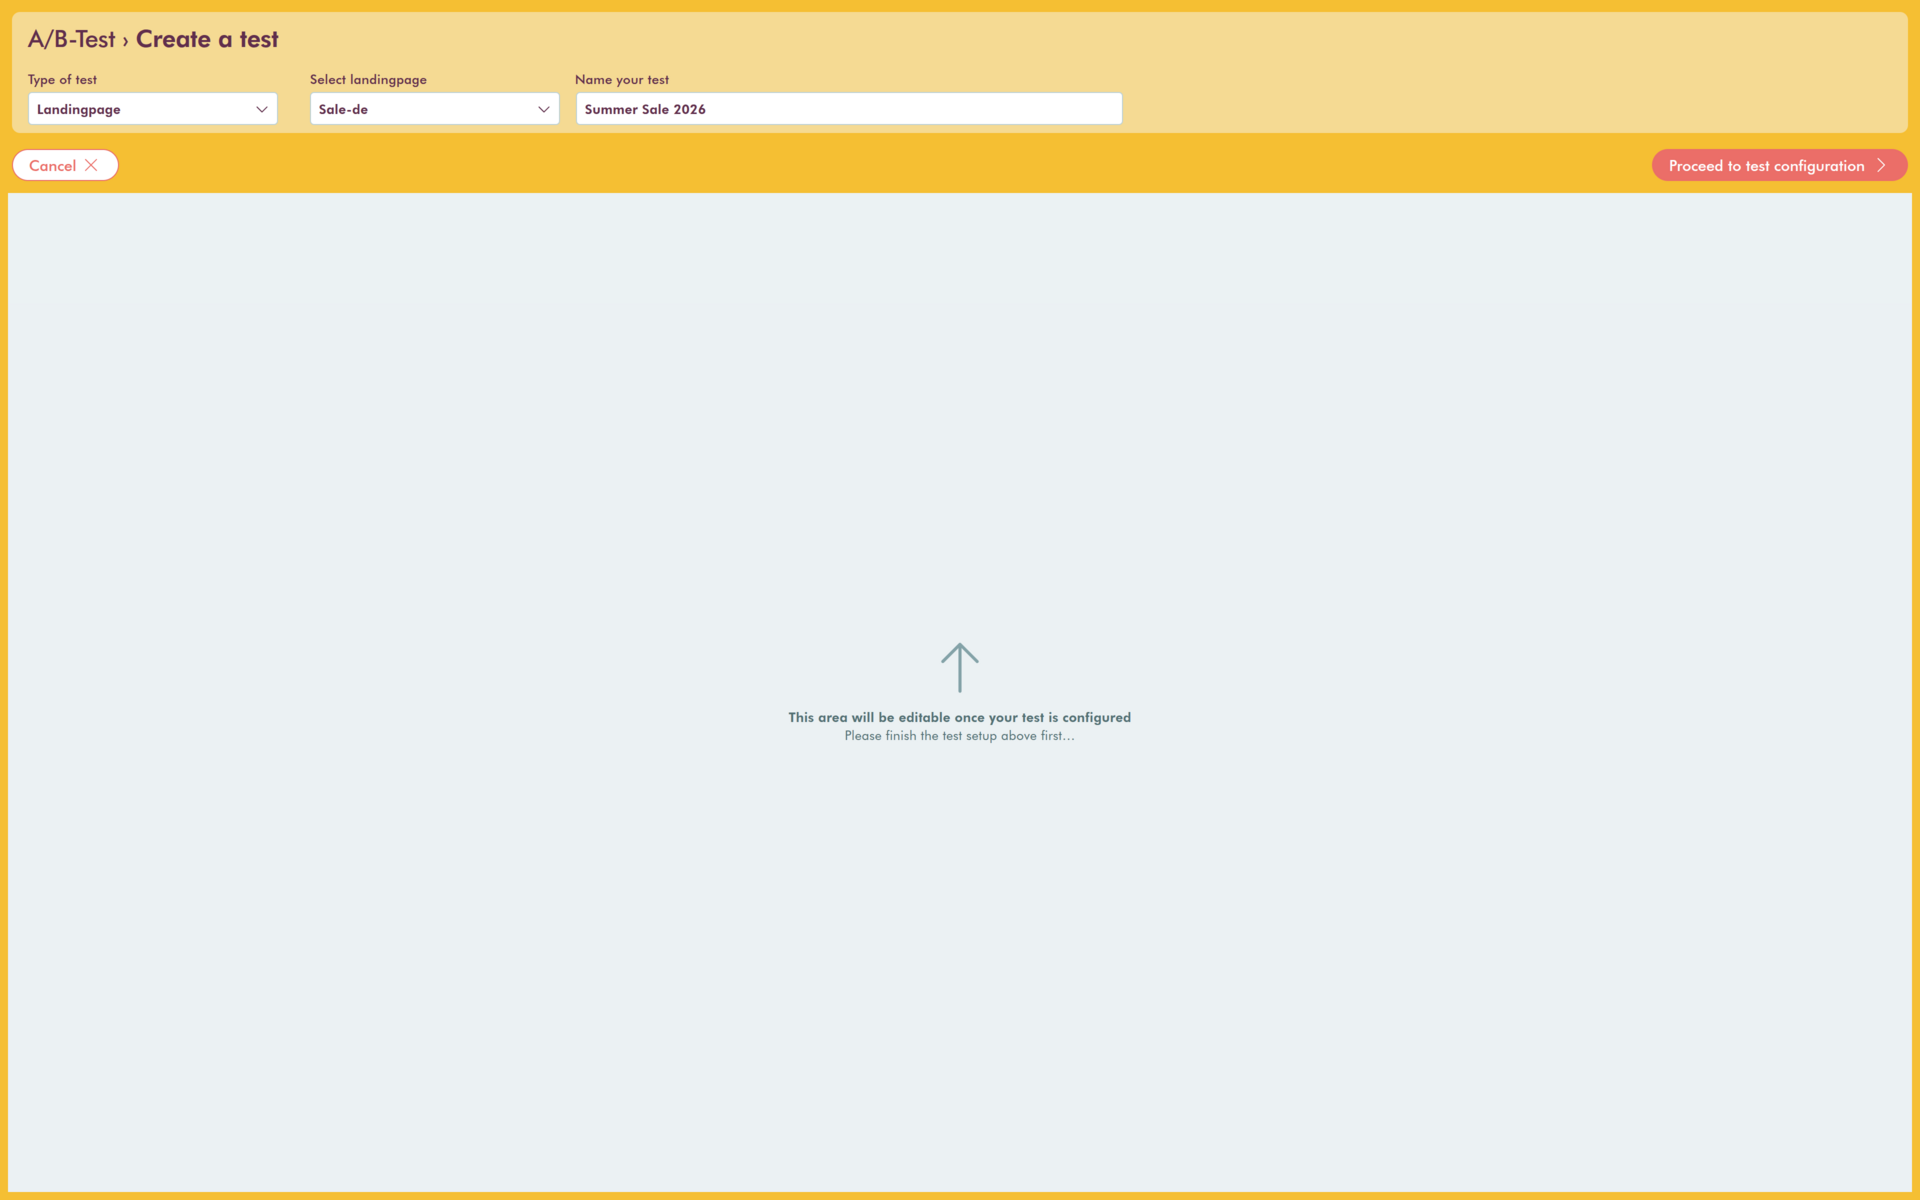
A landing page experiment supports up to three variants: A (original), B, and C. The version selector that other test types show is hidden here — variants are defined directly on the page content (see previous step).
3. Define the traffic split
In the experiment configuration step, set how traffic is divided between the variants:
- For a two-variant test (A/B): e.g. A 50% / B 50%.
- For a three-variant test (A/B/C): e.g. A 40% / B 30% / C 30%.
The percentages must add up to 100. A minimum of 1% must remain with the original (A).
Traffic distribution cannot be changed once the test has started. This is by design — modifying the split mid-flight would invalidate the statistical evaluation.
4. Start the experiment
Click Start experiment. Visitors are now assigned to a group based on your traffic split, and Matomo begins collecting data for each variant.
A running landing page experiment is visible in two places:
- In the A/B Experiments list (status "running").
- On the landing page itself in the Page Editor — the page is locked for general editing while the experiment runs to prevent inconsistent measurement.
Evaluating a Landing Page experiment
While the experiment is running and after it has stopped, you can open the results panel from the A/B Experiments overview by clicking the statistics icon.
Unlike other test types, a landing page experiment shows its results in two tabs, because two very different questions are being answered:
| Tab | What it measures | Scope |
|---|---|---|
| Experiment results | The standard commerce metrics — Orders, Bought products, Revenue, Bounces, Average Visit Length — exactly as in any other A/B test (see A/B Experiments → Reading the results). | Shop-wide (the whole visit / session) |
| Landing page metrics | Page-engagement metrics for the landing page itself — Unique Pageviews, Pageviews, Bounce Rate, Exit Rate, Avg. Time on Page. | Scoped to the specific landing page URL |
Both tabs use the same chart-and-table layout and the same per-variant comparison; only the metric set and the scope differ.
The "Experiment results" tab is shop-wide, not funneled to the landing page. Once a visitor is assigned a variant on the landing page, Matomo attributes their entire session anywhere in the shop to that variant. So an order the visitor places later on a product or checkout page still counts toward the variant — these numbers reflect the downstream effect of the landing page variant on the whole shopping journey, not only conversions that happened on the landing page. The same applies to Bounces (whole-session bounce) and Average Visit Length (whole-session duration).
If you want the metrics that are measured on the page itself, use the Landing page metrics tab — that is where Bounce Rate and Avg. Time on Page refer specifically to the landing page, not the session.
Landing page metrics (page-scoped)
The Landing page metrics tab tracks page-engagement metrics for the specific landing page, taken from Matomo's page-level reporting (Actions.getPageUrls, filtered to the page's URL). These are additional to the commerce metrics in the Experiment results tab and answer a different question: how visitors interact with the page itself, rather than how the whole shop converts.
The following five metrics are available per variant:
| Metric | What it means |
|---|---|
| Unique Pageviews | Number of visits during which the landing page was viewed at least once (a page reload in the same visit is not counted again). This is the variant's sample size. |
| Pageviews | Total number of times the landing page was loaded, including repeated views within the same visit. |
| Bounce Rate | Share of visits that entered on this landing page and left without viewing any other page, in %. Lower is usually better. |
| Exit Rate | Share of all visits that viewed the page and then ended their session on it, in %. |
| Avg. Time on Page | Average time visitors spent on the landing page before moving on, in seconds. |
"Unique" vs. non-unique counting. A unique count collapses repeated activity within the same visit into one, while a non-unique count adds up every single occurrence.
- Pageviews counts every load of the page: if one visitor reloads or returns to the landing page three times in the same visit, that is 3 pageviews.
- Unique Pageviews counts that same visit only once, no matter how often the page was loaded — so it reflects how many visits saw the page, not how often it was opened.
- Likewise, Unique visitors counts each distinct person once even if they come back in separate visits, whereas a plain visit/pageview count would tally each return.
Because Unique Pageviews removes the distortion of reloads and back-navigation, it is the more stable sample size — and it is what the per visit and Proven impact figures are calculated against. A large gap between Pageviews and Unique Pageviews simply means visitors are loading the page multiple times per visit.
The result table
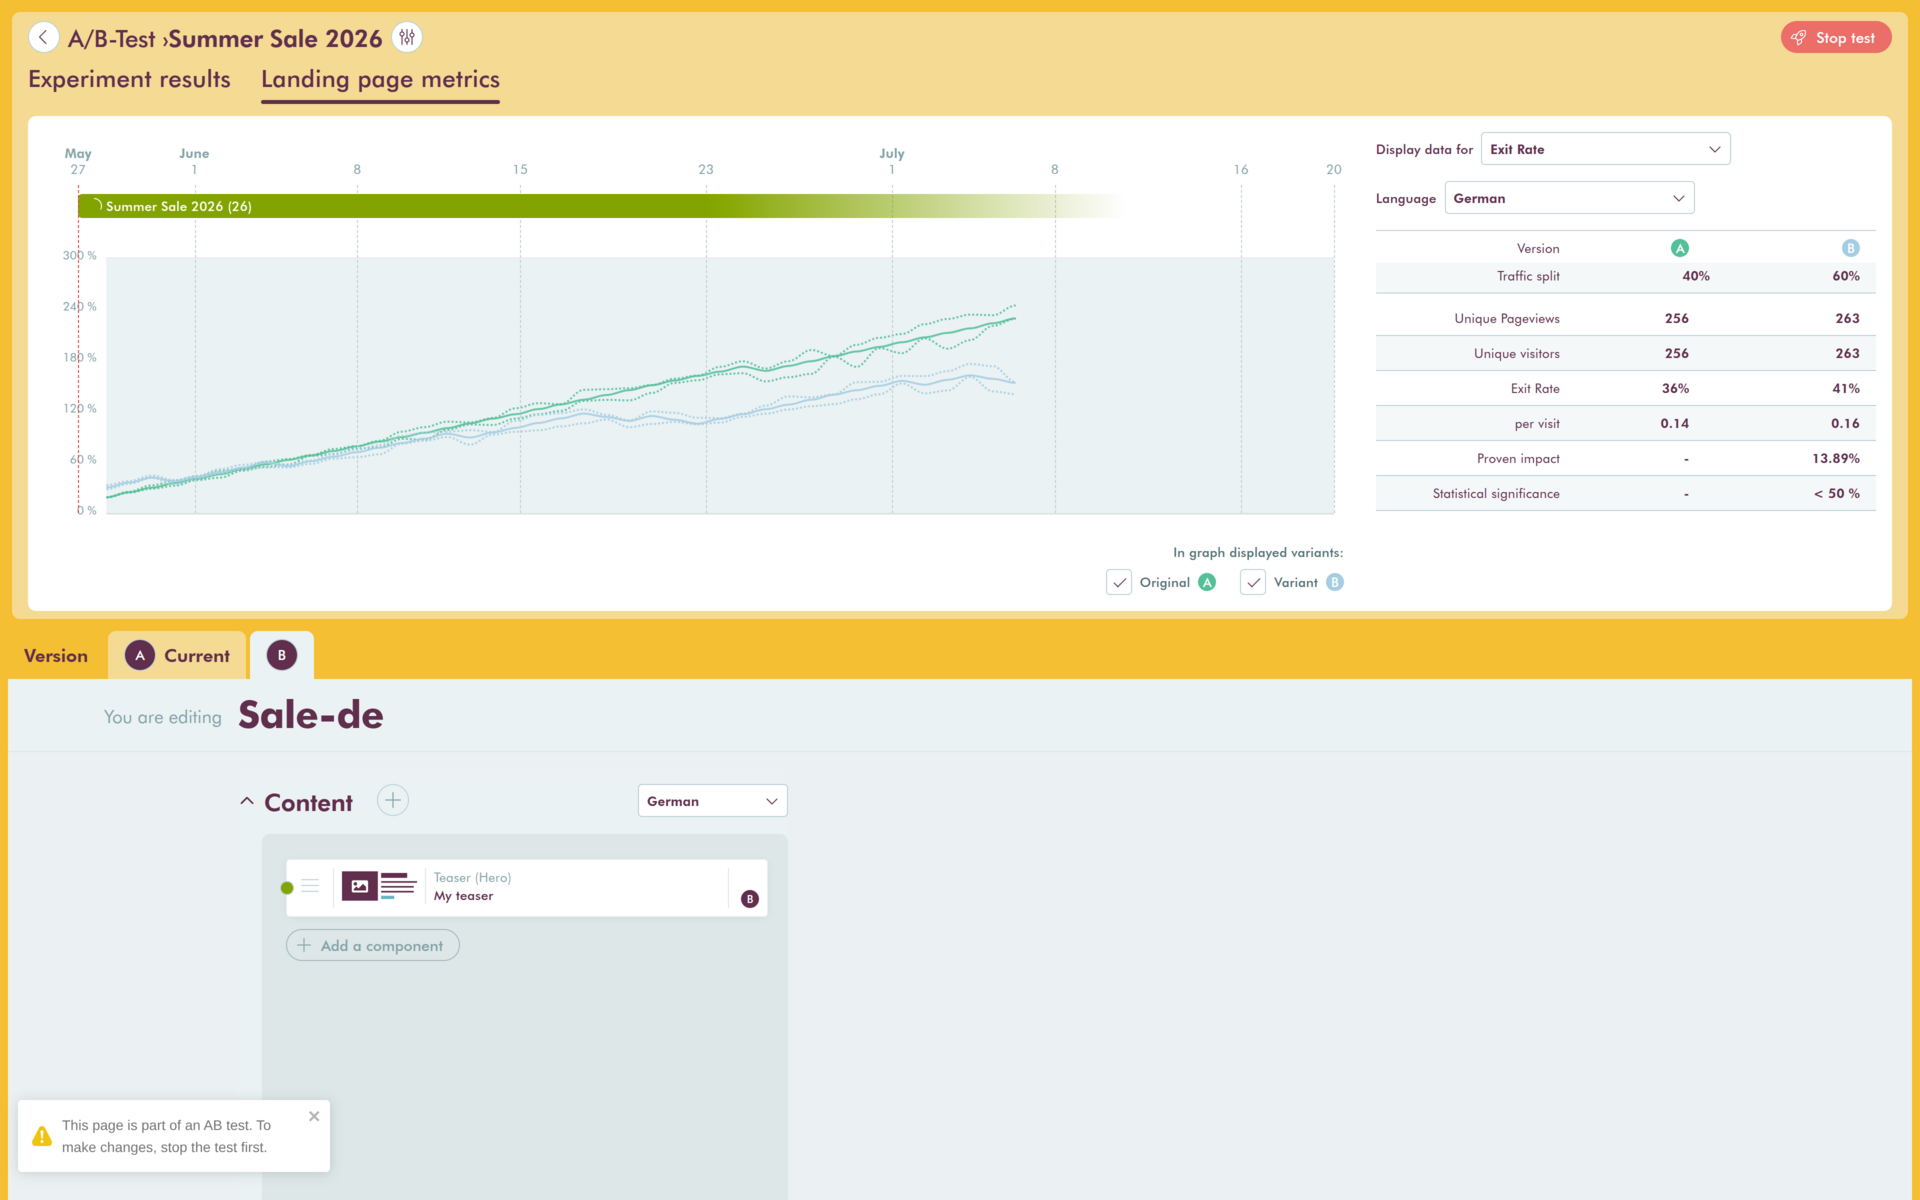
For the selected metric the table compares all variants side by side. Each column is one variant (A = original, B, optionally C); the rows are:
| Row | Meaning |
|---|---|
| Version | The variant label — A (original), B, C. |
| Traffic split | The configured share of visitors routed to the variant. Fixed for the whole experiment. |
| Unique Pageviews | Visits that saw the page — the sample size behind the other numbers. |
| Unique visitors | Number of distinct visitors who saw the variant. |
| <selected metric> | The absolute value of the chosen metric for the variant (e.g. Pageviews count, Bounce Rate in %, Avg. Time on Page in s). |
| per visit | The metric normalised per visit, so variants with different traffic shares can be compared fairly. |
| Proven impact | The relative change of the variant versus the original (A), in %. Positive = the variant did better on this metric, negative = worse. - for the original. |
| Statistical significance | Confidence that the measured difference is real rather than noise, in %. Shown as < 50 % while the data is too thin, and as - until enough days have passed (see note). |
Just like other A/B test types, statistical significance is only calculated after at least 14 days of data collection, and a variant with too few visits is reported as
< 50 %. Don't pick a winner based on an early, low-significance lead.
The chart
The chart shows the development of the selected metric per day, with one line per variant and a confidence band around each line. As long as the bands overlap, the difference between variants is not yet reliable; once they separate and stay apart, the leading variant can be trusted. This is the visual counterpart to the Statistical significance row.
Results are per language. If the landing page exists in several languages (different SEO URLs), the result view reports each language separately, because each URL is tracked as its own page in Matomo. Make sure the language you are evaluating actually received enough traffic.
If all metrics are empty (no visits, no bounce rate), the landing page page-view tag is almost certainly not firing — see the warning under Requirements. Without it Matomo records no pageviews for the landing page and there is simply nothing to evaluate.
Setting the winner live
Once you are confident in the result, you can apply a variant permanently to the landing page:
- In the result table, in the Status row, click set live under the variant you want to keep.
- Makaira rewrites the landing page so that the components tagged for the chosen variant become the new default content.
- The experiment is marked as finished and the page is unlocked for normal editing.
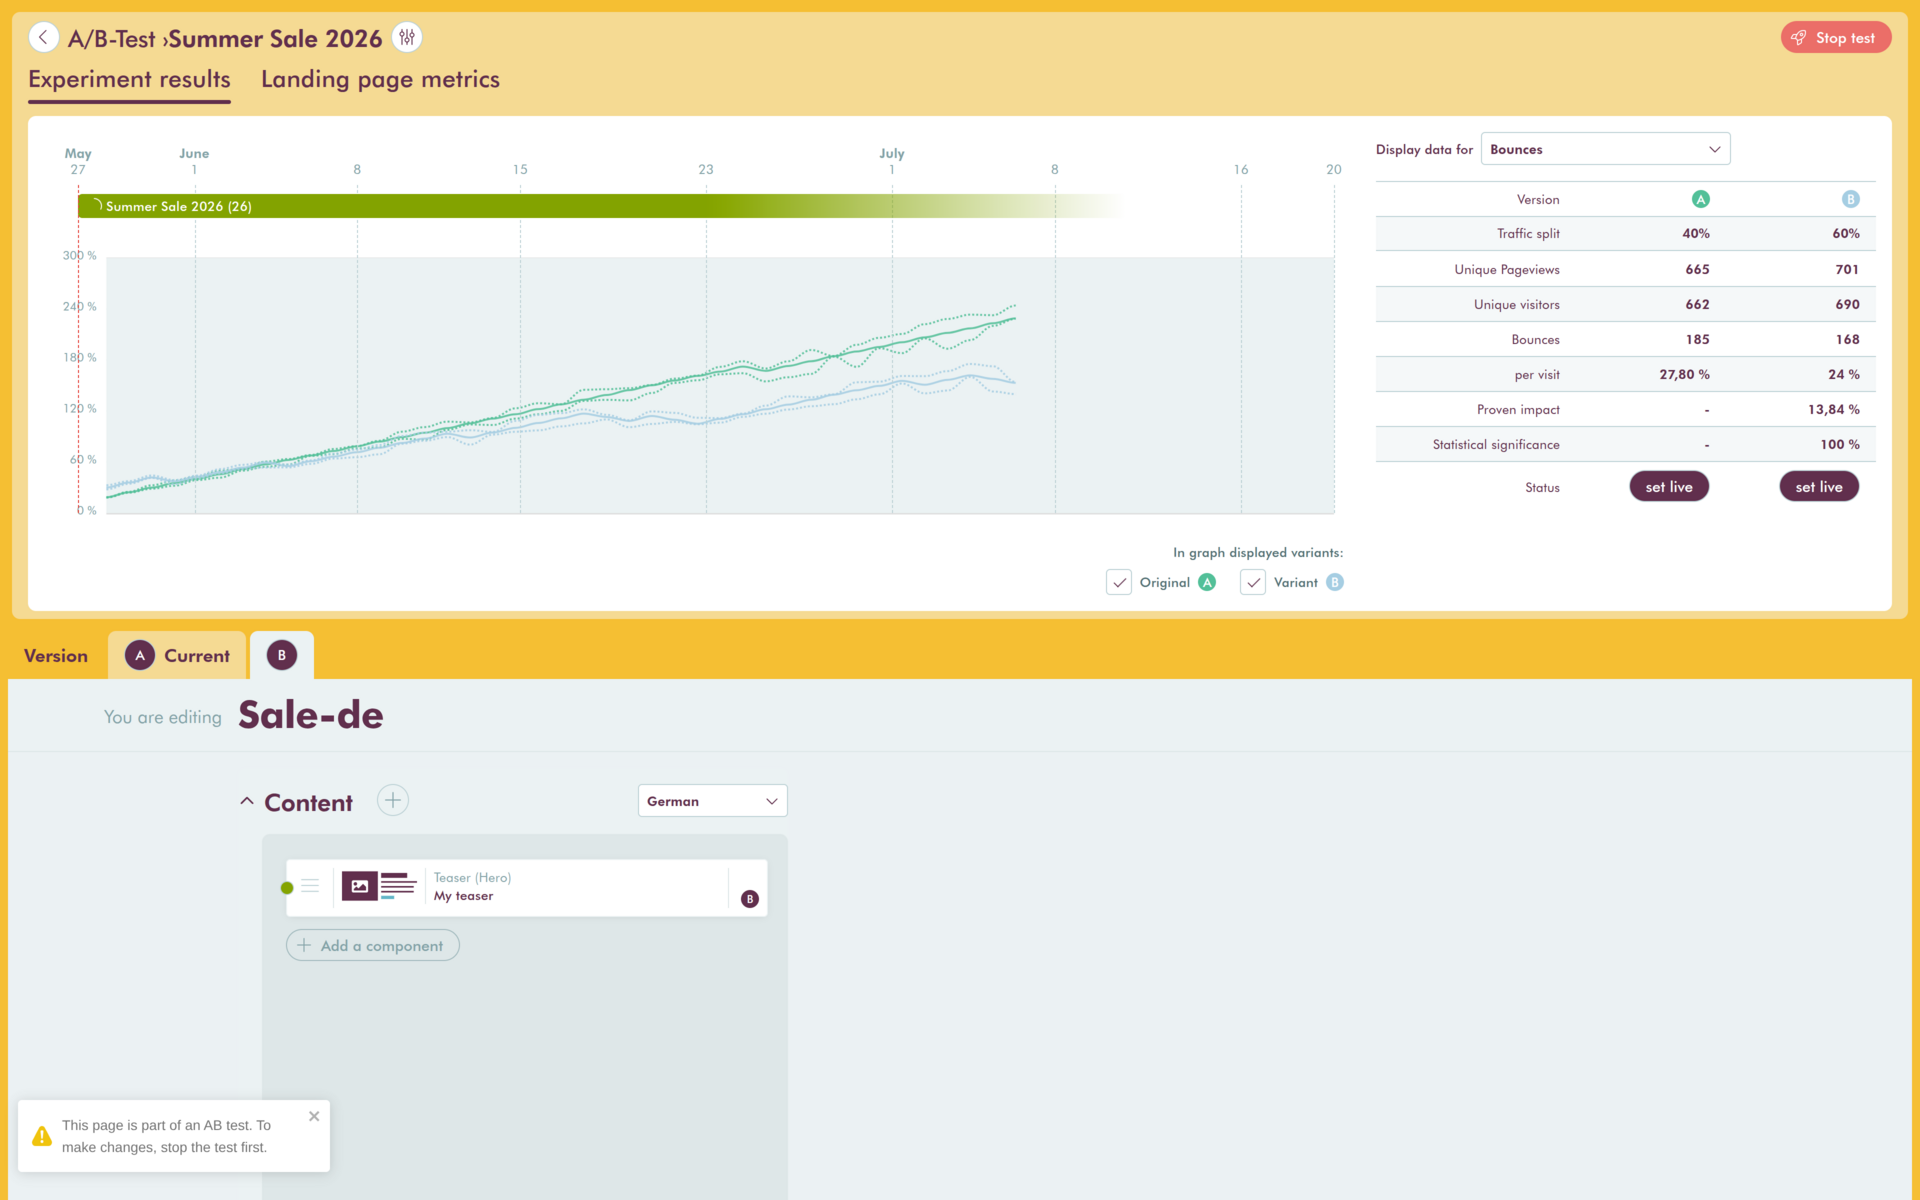
Only one variant can be set live per experiment. After a winner has been applied you will see "Variation X has been set live." in the result panel and the set live buttons are no longer available.
If you decide that none of the variants is convincing, you can simply stop the experiment without applying a variant — the page reverts to its original (A) configuration.
Stopping an experiment
You can stop a running landing page experiment at any time by clicking Stop experiment in the experiment detail view.
- Stopping without clicking set live keeps the original (A) configuration as the live page.
- Stopping and then clicking set live on a variant promotes that variant to the live configuration.
Once stopped, the experiment is read-only and its result is archived. You can open the result view again later from the A/B Experiments overview.
Limits and constraints
- Maximum 5 landing page experiments can run in parallel. Once this limit is reached, additional experiments cannot be started until one of the running tests is stopped.
- Only one experiment per landing page at any time. Landing pages already covered by a running experiment are hidden in the Select landingpage picker.
- If the landing page used by an experiment is deleted while the test is running, the experiment is automatically marked as outdated and can no longer be activated. The result view remains accessible for historical reference.
- Traffic distribution is immutable after the experiment has been started.
A/B testing in the storefront
No additional code is required in the storefront for landing page experiments — variant resolution happens server-side based on the visitor's group assignment from Makaira tracking. The storefront renders the page exactly as it would render any other landing page; only the components matching the visitor's assigned variant are returned.
If you also want to combine landing page experiments with frontend-level conditionals (e.g. hiding/showing arbitrary elements outside the landing page itself), the standard useAbTesting helper continues to work. See A/B Experiments → A/B testing in the frontend.
Updated 4 months ago